February 2, 2026
A book nook Harry Potter scene is one of my favourite crafting projects—it’s essentially a miniature, three-dimensional world you build to slide between the books on your shelf. It creates this wonderful illusion of a magical world hidden right there amongst the spines. This guide will walk you through building your very own, turning a simple box into a detailed slice of the wizarding world.
Picture it: a tiny sliver of Diagon Alley tucked between your favourite novels, its windows glowing softly. That’s the absolute magic of a book nook. It's a crafting trend that really transforms an ordinary bookshelf into a portal of imagination, blending a deep love for stories with the pure satisfaction of building something beautiful with your own hands.

This guide is your map to creating a personalised escape. We'll go beyond the generic kits and show you exactly how to design a scene that feels completely, uniquely yours.
The appeal of a book nook Harry Potter project really lies in its ability to bring a world we love into our physical space. It's more than just a craft; it’s an act of storytelling. This trend has become a global phenomenon, finding a particularly strong foothold in Southeast Asia.
The region's embrace of Harry Potter has turned these miniatures into a booming collector's niche. This really took off after 2020 when lockdowns boosted home decor sales by a massive 200% across Indonesia, Thailand, and Vietnam. It seems to be driven by a huge appetite for fantasy literature, inspiring fans to build physical replicas of iconic scenes like Diagon Alley or the Forbidden Forest.
What truly makes a book nook special, though, is the personal touch you bring to it. While replicating a familiar scene is a lot of fun, adding an unexpected element is what turns it into a one-of-a-kind piece of art.
The most memorable book nooks are those that blend the familiar wizarding world with the creator's own personality and style. It's about making the magic your own.
For instance, you could introduce a piece of Scandinavian folk art, like a simple Dalaart model. An unpainted wooden horse can be transformed into a silvery Patronus, or a quirky piglet model could become a charming sign for a magical sweet shop. Integrating details like custom wood wall art can elevate your project from a simple model to a personal heirloom.
So, let's get ready to turn a simple box into a piece of art that tells a story.
Every great potion needs the right ingredients, and every enchanting book nook starts with the right supplies. Before you start building your own little corner of the wizarding world, it’s best to get everything you need lined up. Think of it as a trip to a crafter's Diagon Alley – no wand required, but a good craft knife is a must.
The outer box is the very foundation of your nook, setting the stage for everything you'll build inside. While you can find kits online, crafting your own from scratch gives you complete creative control.
For a sturdy, long-lasting structure, I always recommend 3mm plywood or basswood. If you're looking for something a bit lighter and easier to work with, 5mm foam board is a brilliant alternative that's simple to cut. Either way, you'll have a solid canvas for your magical scene.
To piece it all together, you'll need a few non-negotiable tools: a sharp craft knife, a metal ruler for perfectly straight cuts, and a dependable adhesive. For wood, nothing beats a quality wood glue. For everything else, especially securing smaller decorative bits, a high-temperature hot glue gun is your best friend.
With the basics sorted, it's time for the fun part: the materials that will shape the iconic architecture of your wizarding world alley.
This is where your book nook truly springs to life. The tiny details are what trick the eye and make the space feel real and lived-in. Spend some time hunting for tiny glass bottles for a potions display, stacks of miniature books, or even little metal cauldrons. Scouring online marketplaces for dollhouse miniatures is a great way to find unique, ready-made treasures.
A little secret from my own projects: don't forget to repurpose! An old bead can easily become a crystal ball, a broken bit of jewellery could be a cursed necklace, and a twig from the garden makes a perfectly gnarled, spooky tree.
To cast that signature magical glow, a simple LED light kit is essential. The ones designed for miniatures are almost always battery-powered, so you don't have to worry about messy wires snaking across your bookshelf. Their thin, flexible wires are incredibly easy to hide behind walls or under the cobblestone floor.
Finally, think about adding one unexpected, personal element. An unpainted wooden figurine, like a Dalaart animal, can be a fantastic feature. Imagine painting a small wooden horse a spectral silver to stand in as a Patronus, or a little rooster in Gryffindor colours to sit proudly atop a shop sign. It's these personal touches that make the magic entirely your own.
Alright, with your supplies laid out, it’s time for the real magic to begin. This is where we construct the core structure of your book nook Harry Potter scene, creating a sturdy and perfectly sized little world that will sit snugly between your favourite books. Getting the foundation right is crucial—it's the difference between a solid scene and one with wobbly walls later on.
It’s amazing to think how much love there is for these miniature worlds. The ‘book nook Harry Potter’ trend has exploded, especially in places like Southeast Asia, where it's been growing since 2017. That year marked the series' 20th anniversary, and the passion was undeniable—reading events in Indonesia alone attracted a massive 450,000 people across 200 cities. That's the kind of enthusiasm that fuels incredible projects like this. You can find more fascinating stats on the series' global impact over at Accio.com.
First things first, let's nail down the dimensions. Most book nooks are about 20-25cm tall, 10-15cm wide, and 15-20cm deep, but it’s always best to measure your own shelf space for a perfect fit.
Grab your sharp craft knife and a metal ruler. You’ll be cutting your main pieces from either plywood or foam board. You need:
A little pro tip I've picked up for getting perfectly clean cuts: don't try to slice through the material in one go. Instead, score it lightly on your first pass, then follow up with two or three deeper cuts. This simple trick prevents those frustrating jagged edges and helps everything fit together seamlessly.
If you’re aiming for a classic Diagon Alley look, you'll also want to cut some interior walls. These will fit inside the main box to create that wonderful illusion of a narrow, winding street. Don’t reach for the glue just yet! A quick "dry fit" is your best friend here to ensure every piece lines up exactly as it should.
Once you’re happy with how everything looks, it's time to make it permanent. Apply a thin, even layer of wood glue (or your adhesive of choice) to the edges of the bottom piece. Carefully attach the back and side panels.
To keep everything locked in at a perfect 90-degree angle while the glue sets, use a bit of masking tape or some small clamps. This is a pretty standard technique for all sorts of DIY builds. In fact, if you enjoy this kind of creative woodwork, you might like our guide on building a DIY wine rack.
This simple graphic shows the basic flow of putting your book nook together, from the box to the final magical details.

As you can see, a solid, well-built box is the essential first step before you can bring the scene to life with all the fun details.
Now, before you get carried away and glue on the top panel or the interior walls, pause and think about lighting. This is the absolute best time to install your LED kit. Think about where you want your lights—peeking out from a shop window, backlighting a sign, or casting an eerie glow down the alley?
Drill small, discreet holes where you need the wires to pass through the panels. Gently thread the wires and secure them on the back with a dab of hot glue or a bit of tape. By doing this now, you can hide all the messy wiring, which makes a huge difference in the final, polished look of your magical world. Once the lights are set, you can confidently glue the rest of your foundation together.
With your structure built and solid, the real fun begins. This is where you get to play artist and transform simple wood and foam into a believable, atmospheric slice of the wizarding world. The right finishing touches are what elevate a model from a craft project to a captivating piece of art.

A thoughtful approach to colour and texture is what will make your book nook Harry potter scene feel truly lived-in. It’s all about layering effects to build up that sense of history and character.
Before diving into the intricate details, every surface needs a good base coat. Think of this as the primer for your masterpiece. It seals the raw materials and gives you a nice, uniform canvas for all the weathering and texturing you’ll do later.
For any iconic wizarding location, the colour palette is crucial for setting the mood. What feeling are you going for?
Use a small, flat brush to apply your base colours, making sure you get even coverage. Don't stress about perfection at this stage—the next steps are all about adding those charming imperfections that bring a scene to life. If you need a little help blending your tones, have a look at our guide on the fundamentals of a colour mixing chart.
This is where the magic really happens. A brand-new, perfectly painted wall just doesn’t look right on a street that’s been around for centuries. We need to add layers of age, grime, and history.
The easiest and most effective technique for this is a "wash." It’s simply thinned-down paint—usually black or dark brown—that you brush over a surface and then partially wipe away.
To make a wash, just mix one part dark acrylic paint with about four parts water until it has a thin, watery consistency. Brush this mixture over your brick walls or cobblestone floors, letting it sink into all the little cracks and crevices. Before it dries, gently dab the raised surfaces with a paper towel. The dark wash will stay in the recesses, instantly creating shadows and the look of years of built-up grime.
This simple trick does wonders for adding depth. Another go-to technique of mine is "dry brushing." You take a stiff brush, dip it in paint, wipe most of it off, and then lightly flick the brush over raised edges. It's perfect for creating highlights and a worn, dusty effect.
The finishing stage is also the perfect time to weave in unique elements that feel like they belong in the wizarding world. This is where a custom piece, like an unpainted Dalaart figurine, can really become a star feature.
Instead of just placing an item in the scene, make it part of the story through your painting. For example, you could transform a simple wooden Dala horse into a shimmering Patronus with a coat of spectral silver and ethereal blue paint. Or, a Dala pig could be painted with whimsical stripes to become the hanging sign for a magical sweet shop, perfectly blending your personal flair with the world you’re building.
You’ve built the structure and weathered the paintwork to give it that perfect, aged feel. Now comes the best part—the bit where your little world truly comes alive. It's the tiny, intricate details that transform a simple model into a scene you feel like you could almost step into. This is where you get to play set-dresser and populate your creation with all the magical bits and bobs.
This love for creating miniature worlds isn't just a niche hobby; it's a global phenomenon. It’s particularly true in Southeast Asia, where Harry Potter became a cornerstone of the reading culture for a generation. The boom in online creativity in places like Indonesia and the Philippines has spilled over into hands-on crafts. In fact, local artisans in Manila and Jakarta saw a massive 150% jump in DIY book nook kit sales between 2020 and 2022, driven almost entirely by what people were seeing and sharing on social media. You can dive deeper into this cultural trend over at Funstory.ai.
Sure, you could buy pre-made miniatures, but there’s a special kind of satisfaction that comes from making them yourself. It adds a personal touch that you just can't get from a store. Plus, you can make most of these things from simple materials you probably already have lying around.
Once your miniatures are ready, their placement becomes its own art form. You're not just filling a space; you're guiding the viewer's eye on a journey of discovery. Think like a set designer for a moment.
The goal is to create a natural flow. Maybe you place a brightly coloured potion bottle in a shop window to catch the eye first. From there, a fallen book on the cobblestones might draw the gaze further down the alley, where a flickering light hints at something more. It's this intentional placement that makes a scene feel dynamic and full of life.
Treat your book nook like a single, perfect frame from a film. Every single object should have a purpose and add to the atmosphere and story you're trying to build.
A quick word of advice: don't overcrowd the scene. Sometimes, a few well-chosen items make a much bigger impact than a cluttered mess. Leaving a bit of empty space gives the important details room to breathe and be properly admired.
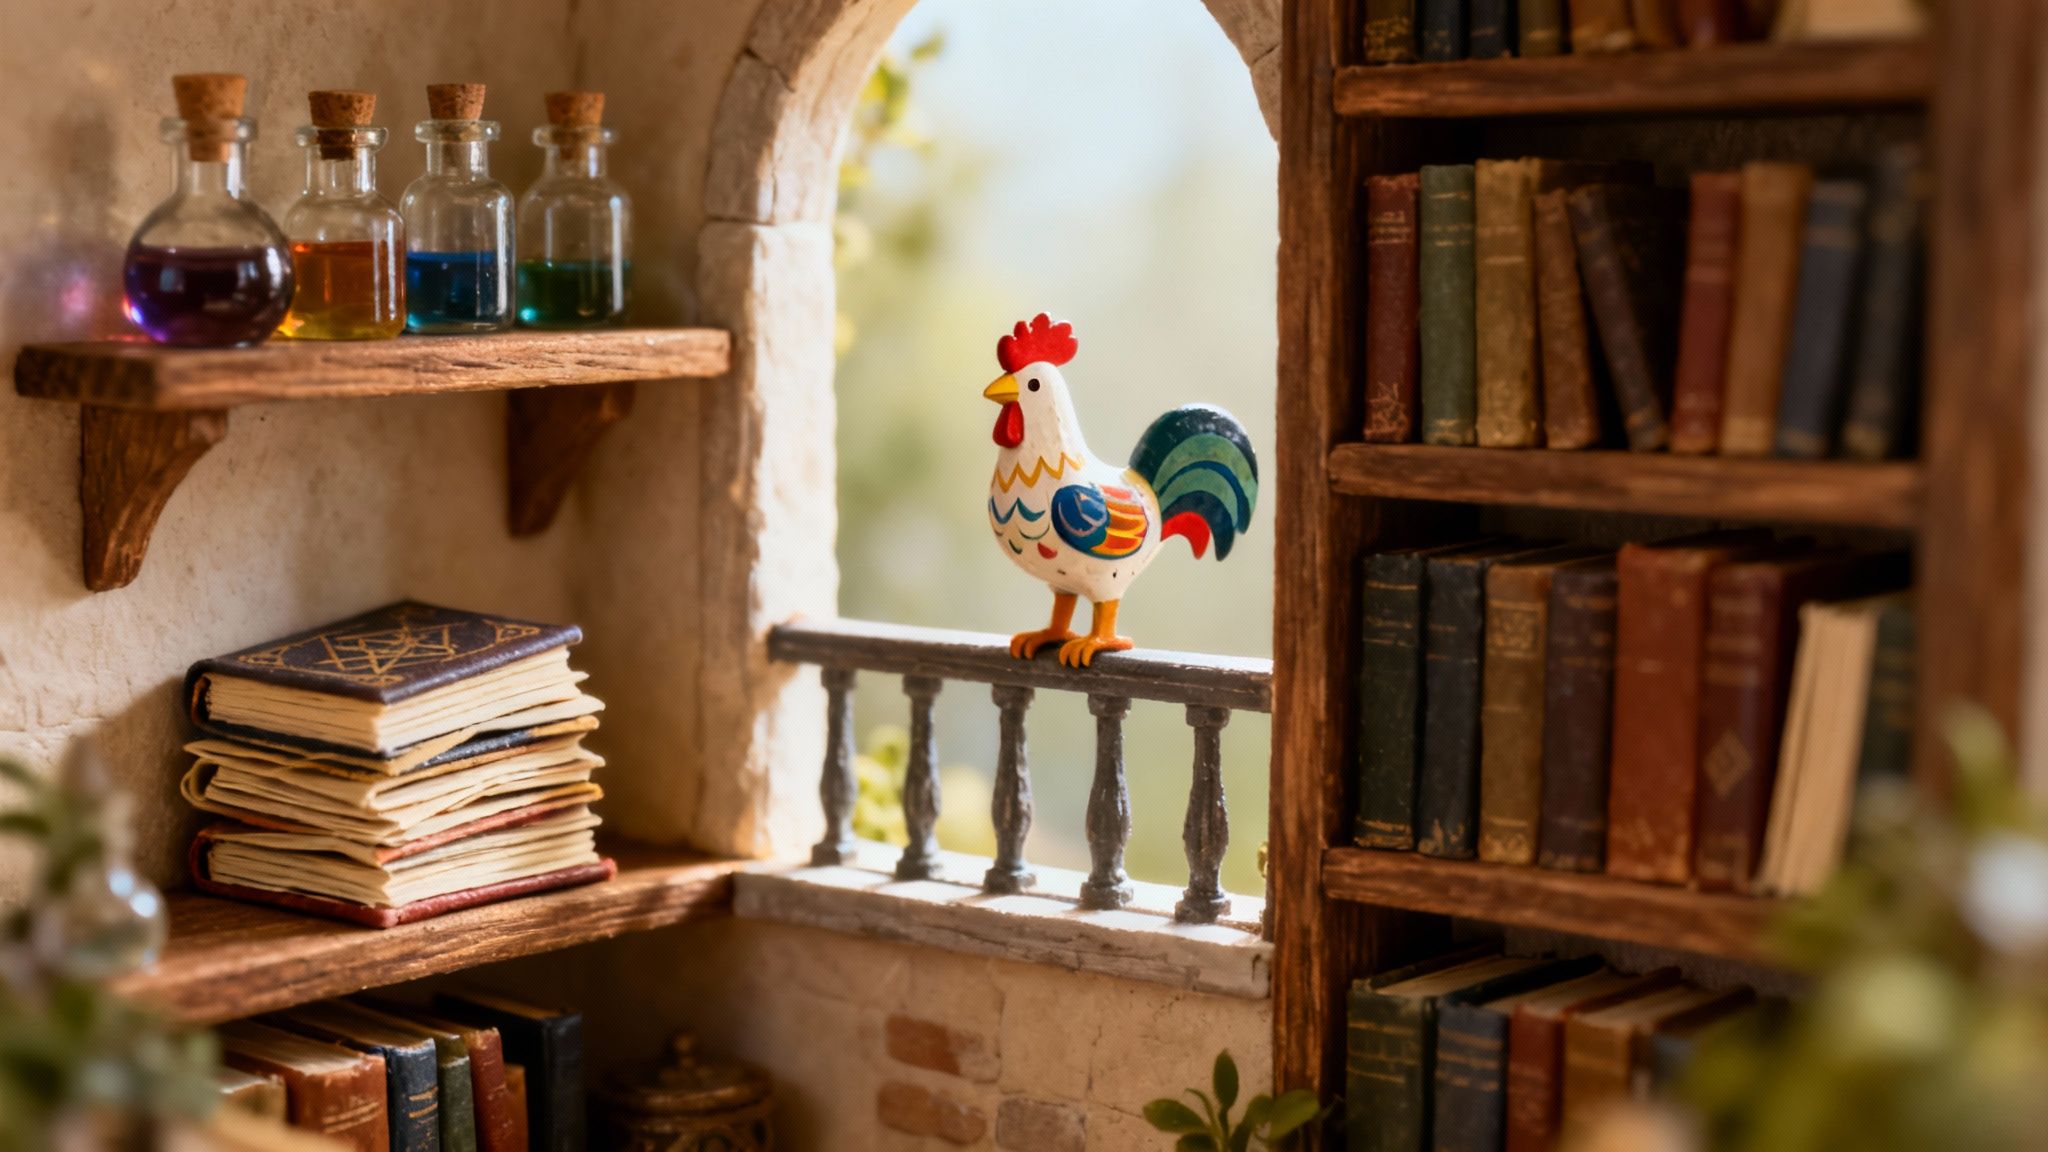
Alright, it's time for the final flourish—positioning that one special element that makes this creation undeniably yours. This is where your custom Dalaart piece takes centre stage. Whether it’s a tiny rooster painted in house colours sitting on a balcony railing or a silvery horse poised like a Patronus in a shadowy corner, its placement is everything.
You'll want to put this focal point where it has the most impact. Perhaps it's highlighted by its own tiny LED or placed at the natural end of the alley's sightline. This little piece is the heart of your personal story within the wizarding world, the signature that makes this magical nook entirely your own.
As you start bringing your own miniature magical world to life, you’re bound to hit a few snags or have some questions pop up. It happens to all of us! Let's walk through some of the most common queries I hear from fellow makers, so you can tackle any crafting challenges with confidence.
If you're just dipping your toes into this hobby, 5mm foam board is your best friend. It’s wonderfully lightweight, a breeze to cut with a standard craft knife, and it’s pretty forgiving if you make a slight miscalculation with your measurements.
However, if you're aiming for a more permanent, heirloom-quality piece, I’d steer you towards 3mm plywood or basswood. These woods create a seriously sturdy structure that can handle layers of paint and glue without a problem, giving your project a high-quality finish that will stand the test of time. My advice? Try to avoid using standard cardboard; it almost always warps when you introduce anything wet like paint or PVA glue.
The simplest and most common way to light up your scene is with a small, pre-wired LED kit. The vast majority of these run on a tiny battery pack, usually powered by button cell or standard AA/AAA batteries. These packs come with a simple on/off switch, making them incredibly straightforward to use.
A little pro tip I’ve learned over the years: always plan for a hidden spot for the battery pack. You could build a false back, a hollow top, or a small compartment underneath. This way, you can easily swap out batteries without having to deconstruct your beautiful scene.
While you might see some very advanced crafters wiring their nooks with USB connections, a battery pack is easily the most practical solution for a clean, cord-free look on your bookshelf.
Ah, the real magic is in the ageing! This is a process called weathering, and it’s what turns a craft project into a believable, miniature world. Once you’ve painted your base colours, the most effective technique is applying a "wash."
It's simpler than it sounds. Just thin down some black or brown acrylic paint with water until it has an inky, runny consistency. Brush this mixture liberally over surfaces like your brick walls or cobblestone floor, then immediately wipe most of it away with a paper towel. The watery, dark paint seeps into all the little cracks and crevices, creating instant grime and depth.
You can also try "dry brushing" with a lighter colour. Get a tiny bit of paint on an old, stiff brush, wipe most of it off, and then lightly skim it over raised edges. This will highlight the texture and give everything a wonderfully worn, dusty look.
Not at all! In fact, this is where you can make the scene uniquely yours. The trick is to integrate the item so it feels like it belongs in the wizarding world. An unpainted Dalaart figurine, for instance, is a perfect starting point.
Imagine painting a traditional Dala horse a shimmery, spectral blue to look like a Patronus charm solidifying in the alley. Or, you could take a small wooden rooster, paint it in bright, eccentric colours, and mount it as a whimsical shop sign for a magical menagerie. By giving it a story—making it an enchanted object, a magical creature, or just a quirky piece of wizarding decor—it transforms from a simple figurine into a personal, meaningful part of your book nook Harry Potter world.
Ready to find that perfect, personal touch for your magical creation? Explore the collection of authentic, hand-carved wooden figurines at Dalaart and discover the ideal piece to bring your own story to life. Find your next enchanting detail at https://dalaart.com.


.svg)


.png)


