January 24, 2026
Ready to hook your next favourite top? This guide contains the complete virkad topp dam mönster (that’s Swedish for a crocheted women’s top pattern) you'll need, drawing inspiration from classic, timeless Scandinavian design. I'll walk you through everything required to craft a beautiful, modern top with deep roots in Swedish heritage.
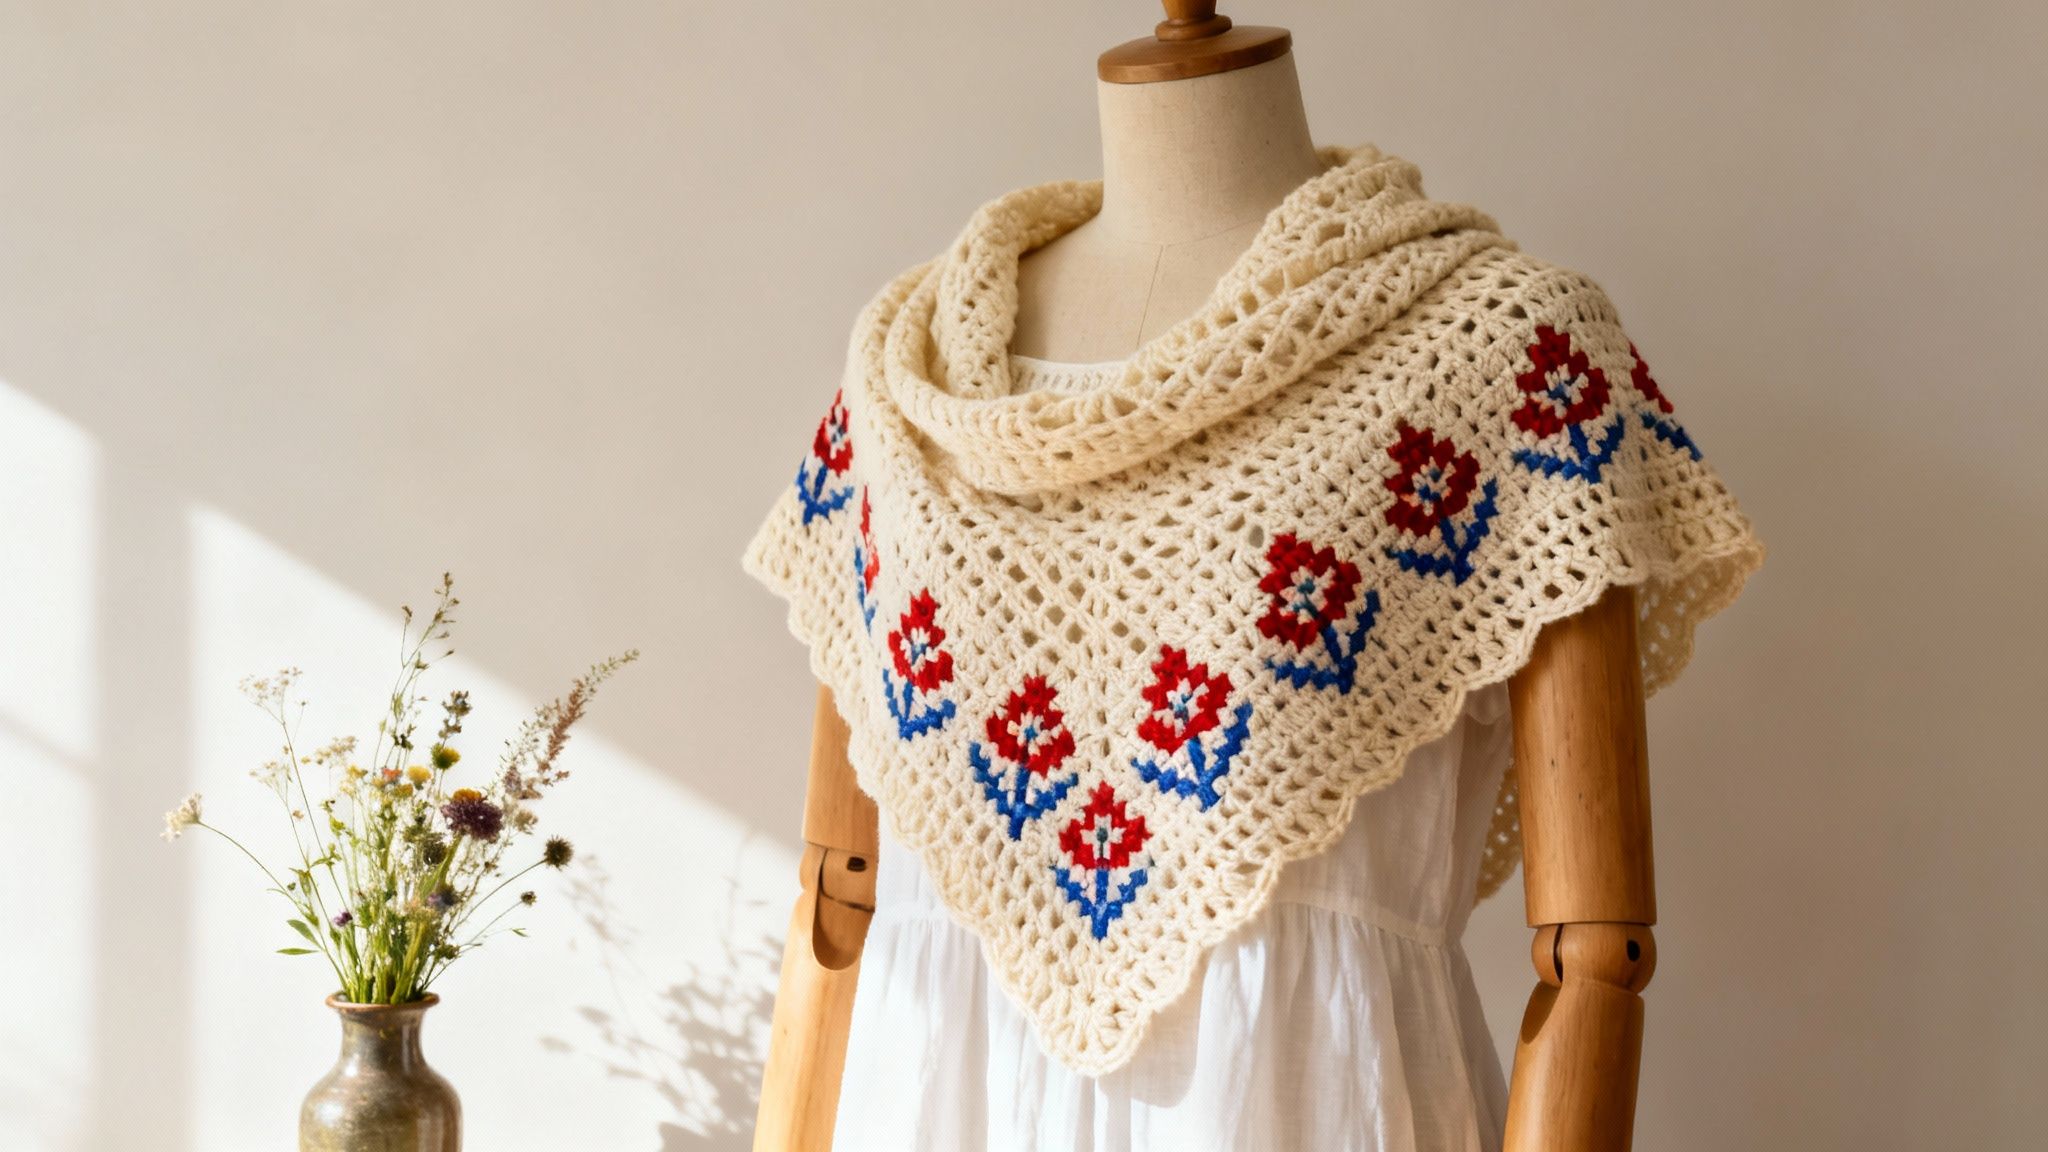
Making a garment by hand is so much more than just following steps; it’s about connecting with tradition and pouring a little bit of yourself into every stitch. This project, which I’ve named the 'Solsken' top, is a little journey into the heart of Swedish craft. It’s designed to be just as much of a joy to make as it is to wear.
The design itself is a blend of a simple, modern silhouette with delicate details that give a nod to Sweden's rich artistic history. Before we get into the yarn and hooks, let's take a moment to appreciate the beautiful inspiration behind this pattern.
The soul of this top comes straight from Dalarna, a region in central Sweden famous for its wonderfully vibrant folk art. You'll find that a traditional "virkad topp dam mönster" often pulls from these regional motifs, where artisans have long combined knitting and crochet with the iconic kurbits flower patterns.
If that sounds familiar, it’s because these are the same swirling, colourful designs you see on the famous Dala horses! While crochet gained popularity across Sweden in the mid-19th century, it truly found its footing in Dalarna during an economic boom in the 1920s. This was right around the same time workshops like Grannas A. Olssons Hemslöjd (founded in 1922) started making their painted wooden horses with similar decorative flair.
This connection isn’t just for looks; it’s about a shared spirit of craftsmanship and storytelling. As you work through this pattern, you’re taking part in a long, beautiful lineage of creative expression.
This project is designed to feel like you're painting with yarn. You'll use stitches to build textures and shapes that remind me of the hand-painted details on a classic Dala horse. It’s truly a wearable piece of art.
I've structured this guide to make sure you feel confident and supported at every stage. Whether you're a seasoned crocheter who has made dozens of garments or you're looking to tackle your very first one, the focus here is on clarity and context, not just a list of instructions.
Here’s what you can expect:
This pattern is such a wonderful way to explore how historical art forms can influence modern fashion. Let's get started and create a beautiful top that celebrates both your skill and the enduring appeal of Swedish design.
Half the fun of a new project is gathering the perfect supplies. Getting everything lined up before you cast on makes the whole process so much smoother and more enjoyable. It means less time hunting for a stitch marker and more time crocheting! Let's walk through what you'll need for this lovely virkad topp dam mönster.
The yarn you choose is probably the single biggest decision you’ll make. It completely defines the drape, the feel, and how breathable your finished top will be. For a summery piece like the 'Solsken' top, plant-based fibres are your absolute best bet. They’re wonderfully lightweight and let the air flow, keeping you cool on warmer days.
Here are a few fantastic options to consider:
If you’re asking me, my personal favourite for this project is a good cotton-linen blend. The linen gives just enough structure to help the lace pattern hold its shape, while the cotton makes sure it's wonderfully soft from the very first wear.
Besides your yarn, you'll need a few other trusty tools. Having the right equipment really does make all the difference in creating a piece that looks polished and professional.
Make sure you have these handy before you start:
Alright, let's have a chat about the single most important step for making any crocheted garment that actually fits: gauge. Gauge is simply a measurement of your stitches and rows within a set area, usually a 10 cm x 10 cm square.
Think of gauge as the DNA of your project's final size. If your gauge is even a little bit off, your top could easily end up a size too big or a size too small, no matter how carefully you follow the rest of the pattern.
Skipping the gauge swatch is a temptation I understand, but it's a mistake that so often leads to a finished object that doesn't fit. Trust me on this one. Taking an extra 30 minutes to make a swatch can save you from hours of frustration and heartache later. It's the best project insurance you can get.
To check your gauge for this virkad topp dam mönster, you’ll just need to crochet a little sample square.
First, grab your chosen yarn and hook and chain enough stitches to make a piece about 15 cm wide. Work in the main stitch from the pattern until your swatch is about 15 cm tall, creating a square.
Next, fasten off and—this is key—wash and block your swatch exactly how you plan to care for the finished top. So many fibres, especially cotton and bamboo, can grow or change shape after a wash, and you want to know that before you've made the whole garment.
Once it's completely dry, lay the swatch on a flat surface without stretching it out. Use your tape measure and count how many stitches and rows you have in a 10 cm x 10 cm section right in the middle of the swatch.
Finally, compare your numbers to the gauge listed in the pattern. If you have too many stitches, your tension is a bit tight, so try going up a hook size. If you have too few stitches, you're a bit loose, so try a smaller hook. Keep adjusting and swatching until you hit those numbers perfectly. It’s the one step that guarantees all your hard work pays off with a top you'll absolutely love to wear.
Alright, let's get down to the best part—turning that lovely yarn into something you can wear! Here you’ll find the complete, row-by-row pattern for the Solsken top. It’s a gorgeous virkad topp dam mönster I designed to be both elegant and wonderfully comfortable.
Just a heads-up, the instructions are written using standard UK crochet terms. If you're more familiar with US terms, it might be worth having a quick look at a conversion chart before you begin.
We’ll be making this top in two separate flat panels, a front and a back, working from the bottom hem upwards. I love this construction method because it’s so easy to lay your work flat and check your measurements as you go. To help you stay on track, I've popped the stitch counts in brackets at the end of key rows—think of them as little checkpoints.
This little visual guide shows the simple workflow for getting your project ready, from picking your yarn to nailing that all-important gauge.
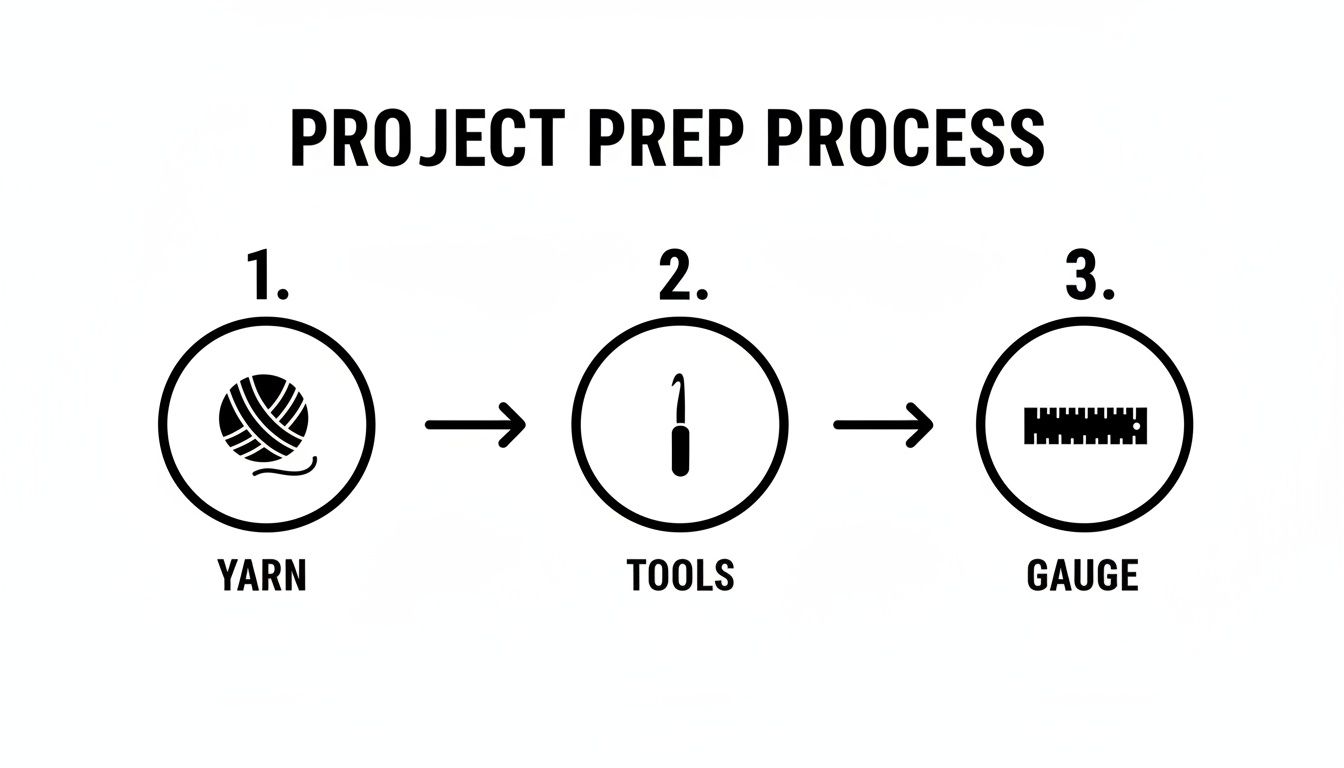
Following this sequence is the secret to making sure your finished top fits just like you imagined and drapes beautifully.
Before you dive into that first row, let’s quickly cover a few essentials. Trust me, a quick read-through now will make the whole process much smoother and help you sidestep any common hiccups.
The body of the top gets its character from a delicate lace stitch that’s a breeze to memorise once you get the rhythm down. It’s just a simple two-row repeat that creates a lovely, airy fabric—perfect for a summer top.
Here’s the stitch repeat you’ll be using for the main body panels:
This mix of a textured treble row and a simple double crochet row builds a stable yet open fabric that looks much more complicated than it really is. It’s a wonderful technique for any virkad topp dam mönster.
Let's kick things off with the front panel. Grab your 4.0 mm hook (or whatever size gave you the correct gauge) and let's make a foundation chain.
Foundation Chain: Ch 94 (104, 114, 124, 134).
Row 1 (RS): Work a tr in the 4th ch from your hook (those 3 skipped chains count as your first tr), then tr in each chain all the way across. Turn. You should have (92, 102, 112, 122, 132 sts).
Row 2 (WS): Ch 1, dc in each st across. Turn. The stitch count remains (92, 102, 112, 122, 132 sts).
Row 3: Ch 3 (counts as your first tr), *miss the next st, tr in the st after that, then tr back into the missed st; repeat from * across to the last st, and finish with a tr in that last st. Turn.
Now you just need to keep repeating Rows 2 and 3. This is the perfect time to settle in, put on a good podcast, and get into a comfortable crochet rhythm.
Continue working in this established lace pattern until your piece measures 34 cm from the beginning, making sure you finish on a WS row (a dc row). Don’t fasten off your yarn just yet.
Pattern Tip: I always pop a stitch marker on the Right Side (RS) of my work. It's a simple visual cue that helps me keep track of which row of the pattern repeat I'm on, especially if I have to put my project down mid-row.
Now it's time to shape the armholes. We’ll do this by working a few slip stitches at the beginning of the next two rows, which creates a neat, stepped edge rather than a harsh cut-out.
Next Row (RS): Sl st into the first 5 (6, 7, 8, 9) sts. Ch 3, then continue in your lace pattern across the row until you have 5 (6, 7, 8, 9) sts left. Leave these remaining stitches unworked. Turn. Your new stitch count is (82, 90, 98, 106, 114 sts).
Your panel is now narrower, forming the main body of the top. From here, you’ll just continue working straight on these stitches (no more decreases) until the armhole is deep enough.
Keep working in the established lace pattern until the armhole section measures 18 (19, 20, 21, 22) cm, ending on a WS row. Don’t cut the yarn—we'll go straight into shaping the neckline.
To shape the neckline, we're going to split the panel and work on the left and right shoulders separately.
Next Row (RS): Work in your pattern across the first 25 (28, 31, 34, 37) sts to create the first shoulder. Turn your work, leaving the rest of the stitches on the hook for later.
Now, working only on this first shoulder, you'll decrease one stitch at the neckline edge for the next 4 rows. This is what creates that gentle, flattering scoop neck.
Neck Decrease Rows:
Once those decreases are done, continue working straight on the remaining shoulder stitches until the armhole measures a total of 20 (21, 22, 23, 24) cm. Fasten off and weave in your ends.
To finish the other side, go back to the stitches you left waiting in the middle of the panel.
Rejoin your yarn at the inner edge of the second shoulder and repeat the exact same process: decrease one stitch at the neck edge for 4 rows, then work straight until the armhole measurement matches the first side. Fasten off.
The back panel is worked almost identically to the front, which makes this a wonderfully straightforward virkad topp dam mönster to work through.
Follow all the instructions for the Front Panel, from the foundation chain right up to and including the armhole shaping.
Work the back panel until the armhole measures the full desired depth of 20 (21, 22, 23, 24) cm. There's no neckline shaping on the back—we want a simple, straight edge across the top.
Once your back panel is the right length, fasten off, but leave a nice long tail for seaming the shoulders together later.
And just like that, your two main panels are finished! Next up, we'll join them together and add those finishing touches that will really bring your Solsken top to life.
You've crocheted the front and back panels, and now it’s time for that little bit of magic that turns your pieces into a gorgeous, wearable garment. A beautiful finish is what makes any handmade virkad topp dam mönster look truly special, and this part of the process is just as important as the crocheting itself.
This is where your project really comes to life!
Let's walk through joining your top, adding those clean edges, and the crucial step of blocking that will absolutely transform your work.
The goal for any seam is for it to be strong yet flexible, and almost invisible. For the Solsken top, we'll tackle the shoulder seams first. This creates a flat, open piece that’s much easier to work on when we add the neckline edging later.
Lay your front and back panels on a flat surface with the Right Sides facing together. Grab that long yarn tail you left on the back panel and a darning needle to get started. My absolute go-to method here is the mattress stitch; it creates a wonderfully flat and nearly invisible join that looks so professional.
Here’s how I work the mattress stitch for the shoulders:
Once both shoulder seams are done and dusted, you can move on to the sides. Keep the panels with Right Sides facing and seam from the bottom hem all the way up to the underarm, using that same trusty mattress stitch technique.
Adding a simple edging around the neckline and armholes does more than just give a clean look. It’s a functional step that provides stability and stops the openings from stretching out of shape over time. A simple round of double crochet (dc) is all you need for a tidy, durable finish.
Let's start with the neckline. With the Right Side of the top facing you, join your yarn at one of the shoulder seams. Work one round of double crochet stitches evenly all the way around the neckline opening. I find that aiming for about three dc stitches for every two rows along the straight parts and one dc in each stitch along the curves gives the best result. Join with a slip stitch to the first dc you made, fasten off, and weave in that end securely.
Now, just repeat this exact same process for both of the armhole openings. Easy!
A little tip I've picked up for getting perfectly even stitches on an edging is to place stitch markers every 5-10 cm around the opening first. Then, you can divide the number of stitches you need by the number of sections you've marked off. It makes it so much easier to work the right number of stitches evenly between your markers.
Honestly, if you only do one thing to finish your virkad topp dam mönster, make it this. Blocking is the transformative final step that relaxes the fibres, evens out any little inconsistencies in your stitch tension, and allows the delicate lace pattern to fully open up and shine. It's an absolute game-changer for lace, as it defines the stitches and creates that beautiful, airy drape we’re after.
It's not just for looks, either. A study on fabric finishing showed that wet blocking can increase a garment's final dimensions by up to 10%, which is why it's so important for getting the perfect fit.
For a cotton or plant-fibre blend top like this one, wet blocking is the way to go. It sounds technical, but it’s a simple technique that yields incredible results.
Once you've got the hang of the basic construction for this virkad topp dam mönster, you can start to see it as a creative canvas. The real joy of making your own clothes is having the power to tweak and tailor them until they perfectly match your personal style. This is where you can truly make the Solsken top your own.
Let's walk through a few simple but really effective ways to personalise the fit, add unique details like sleeves, and play with colour to create a piece that's one-of-a-kind.

One of the easiest changes you can make is altering the length. Whether you're picturing a chic cropped top to wear with high-waisted skirts or a longer tunic style to pair with leggings, the adjustment is incredibly straightforward.
Because the top is worked from the bottom up, all the length is added before you even think about the armhole shaping. To make your top longer, just work more repeats of the two-row lace pattern. If you're after a shorter, cropped version, you simply work fewer repeats. It’s that easy.
A great tip for judging the perfect length is to measure a favourite top you already own, from the hem right up to the underarm. Crochet your panel until it reaches that exact measurement, then you can start the armhole shaping instructions just as they're written in the pattern.
The sleeveless design is gorgeous for warm weather, but adding a small sleeve can completely change the top's silhouette. A simple cap sleeve is easy to work in and adds a lovely touch of extra coverage without needing any complex shaping.
You'll create these sleeves after the top has been seamed at the shoulders and sides.
This method creates a delicate, seamless-looking cap sleeve that looks like it was part of the original design all along.
By adding just a few rounds for a sleeve, you extend the shoulder line slightly. This can create a very flattering silhouette, balancing the proportions of the garment, especially if you have broader shoulders.
Bringing in different colours is a fantastic way to inject your personality into this virkad topp dam mönster. You don't need to be an expert in colourwork to make a huge impact.
Consider these ideas inspired by traditional Swedish folk art:
These customisations are your chance to experiment. The pattern provides a solid foundation, but the final piece is a reflection of your creativity. For more crafting inspiration, check out our guide on making a DIY key ring, which explores similar folk art motifs. Have fun and don't be afraid to try something new
As you settle in to make your beautiful top, a few questions are bound to pop up. It happens to every one of us! I've put together some answers to the most common queries I hear, drawing from my own experience and chats with fellow makers, to help you crochet with confidence.
Think of these as quick solutions to help you troubleshoot any little bumps in the road, ensuring your experience creating this virkad topp dam mönster is as smooth and enjoyable as possible.
While you absolutely can, it does require some careful adjustments. Using a different yarn weight will directly impact your gauge, which means the finished top won't match the pattern's sizing. A thicker yarn will create a larger top, and a thinner one will result in a smaller one.
To make it work, you must start by making a gauge swatch with your chosen yarn and hook. From there, you'll need to calculate your stitches per centimetre and then adjust the starting chain to match the bust measurement for your size. This will also mean modifying row counts to get the correct length and armhole depth.
Oh, the dreaded curling edge! This is an incredibly common issue, especially when working flat panels like these. It's often just a small tension difference between your stitches and your turning chain.
First, check that your turning chain isn't too tight and that you're using the right number of chains for the stitch you're working (for instance, three chains for a treble crochet). The good news is that this problem usually sorts itself out once you've added the final edging and, most importantly, after blocking.
Blocking is the secret weapon against curling edges. Don't stress too much about a bit of a curl while you're still working; this final step relaxes the yarn fibres and encourages the fabric to lie perfectly flat.
The pattern is written to include about 5-10 cm of positive ease, which gives it a comfortable, classic fit that isn't too snug. If you're dreaming of a more relaxed, oversized, or breezy look, my advice is to go up one or even two sizes from your actual bust measurement.
For example, if your bust measures 96 cm (which lines up with a Medium), you could make the Large or even the Extra Large for that looser, more casual feel.
The absolute best way to be certain is to measure a top you already own and love the fit of. Lay it flat, measure its width across the chest, and compare that number to the finished sizes in the pattern chart. This will give you the most accurate idea of which size to make.
If you're working with crochet terms in both Swedish and English, you might find our handy guide on common crafting words useful. You can learn more about this in our helpful Swedish-English lexicon for crafters.
At Dalaart, we celebrate the rich heritage of Swedish craftsmanship that inspires projects like this one. Discover our collection of authentic, hand-painted Dala horses and other folk art treasures, all handcrafted in the heart of Dalarna. Bring a piece of timeless Scandinavian tradition into your home by visiting us at https://dalaart.com.


.svg)


.png)


