January 14, 2026
Decals for tiles are one of the simplest, most budget-friendly ways I know to completely revitalise your home’s look without the mess and cost of a full renovation. These aren’t just stickers; they're high-quality vinyl designs that can make an immediate impact, letting you transform dated patterns into modern masterpieces or just add a splash of personality to plain surfaces in minutes.
Forget the dust, disruption, and expense of a traditional remodel. High-quality tile decals are a wonderfully versatile and creative tool for sprucing up kitchens, bathrooms, and even tired old furniture. It's a straightforward DIY project that lets you express your personal style, making it a brilliant solution for both renters and homeowners who want a significant update without the long-term commitment.
The real appeal is achieving maximum style with minimal effort. You can introduce intricate patterns, bold new colours, or subtle textures to any tiled area. The best part? This approach allows for endless customisation without any permanent consequences.
This clever design trick is catching on for very good reasons. It’s an incredibly accessible way to modernise a space that’s starting to feel a bit drab or outdated.
This trend is especially taking off in areas seeing a boom in home renovations. In Southeast Asia, for instance, where the tile industry is thriving, decals for tiles have become a go-to for enhancing large-format tiles. It’s a perfect fit for the 70% of the urban population there who prefer home designs they can easily customise. You can learn more about these tile industry findings if you're curious.
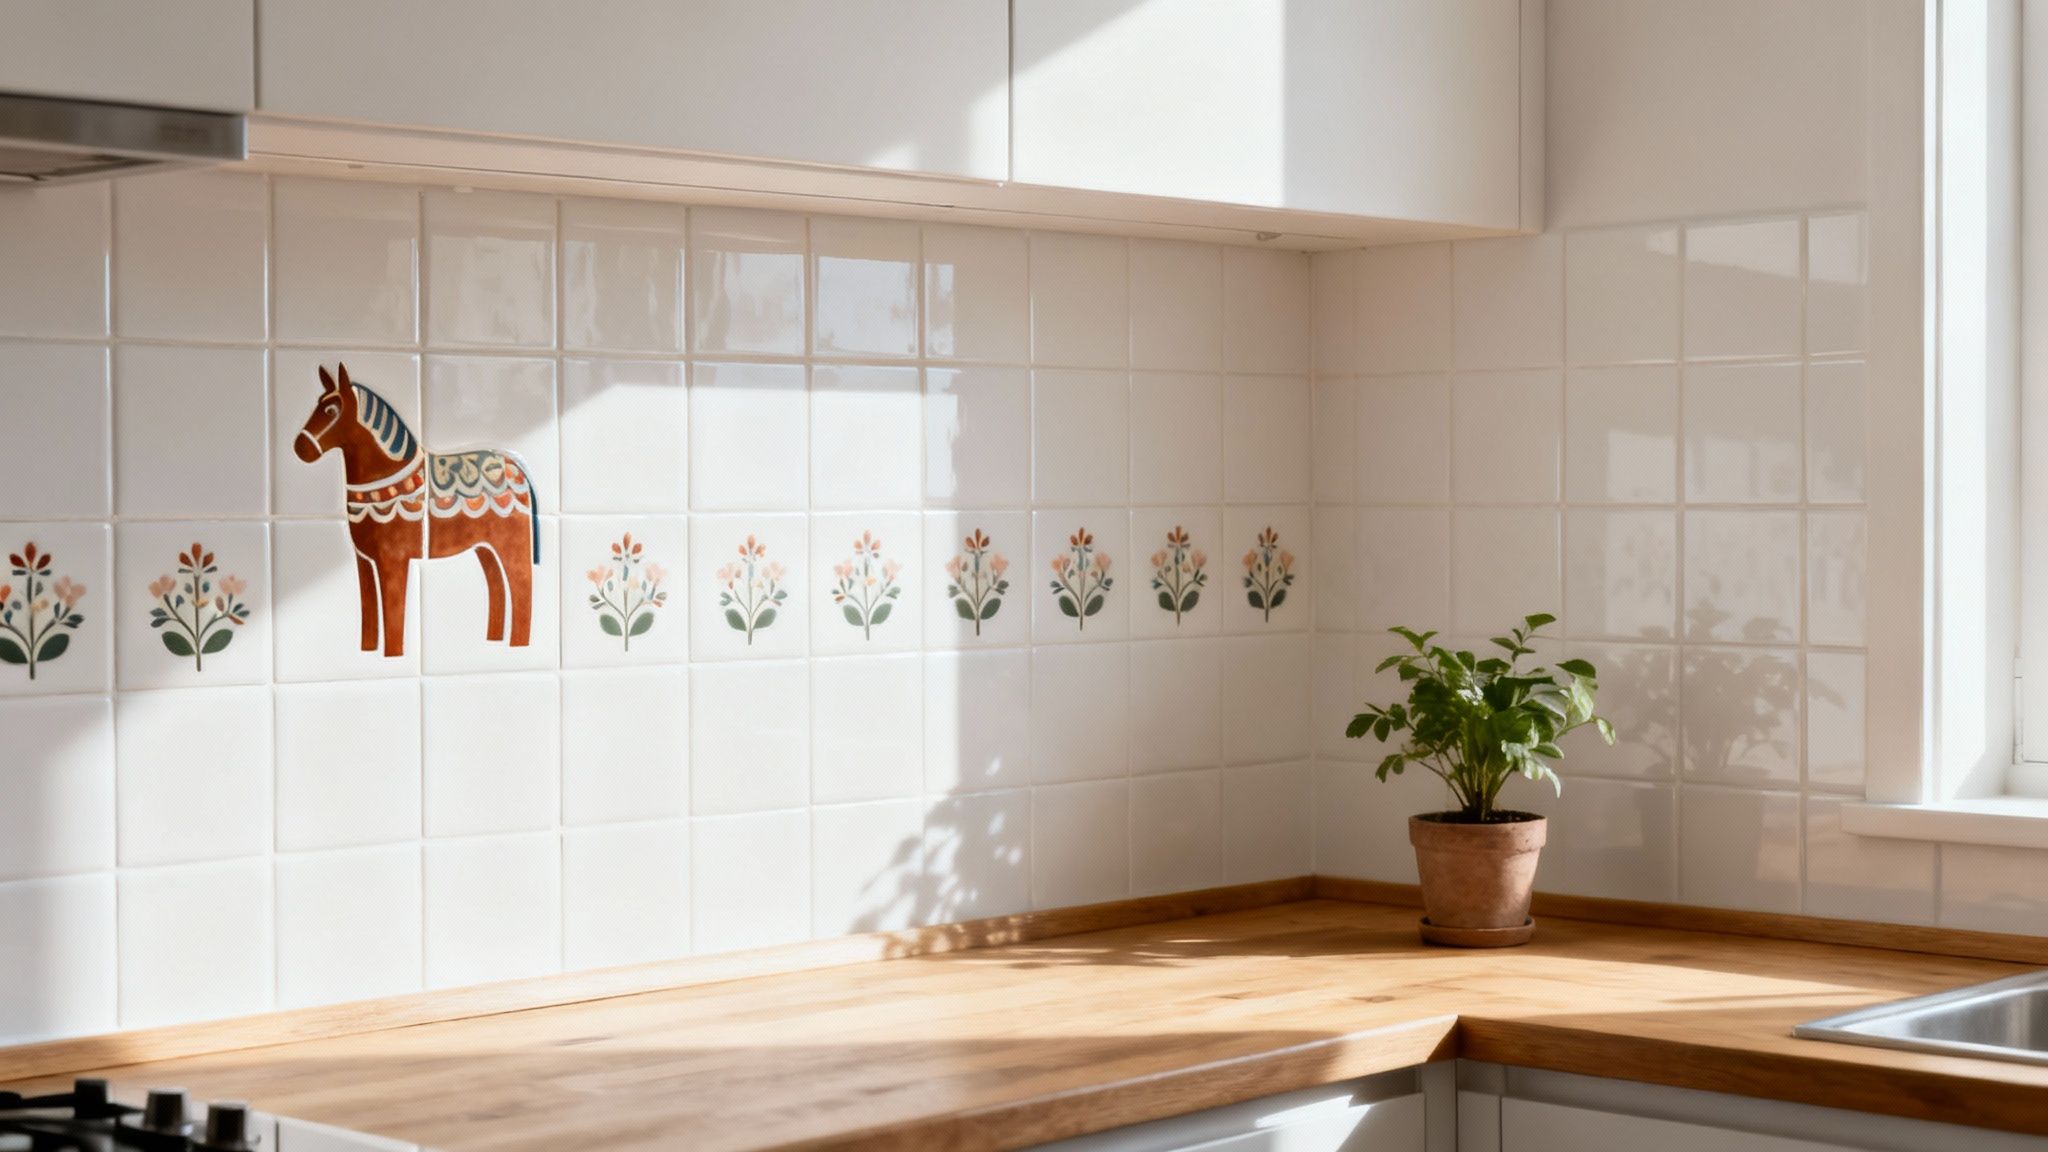
It's also a fantastic way to add character with specific motifs, like classic Scandinavian folk art. Just imagine adding a few charming Dala horse decals to a plain kitchen backsplash—you’d instantly create a beautiful focal point that feels both personal and stylish. That kind of warmth from traditional designs can be echoed by other cosy elements, much like the inviting glow created by the classic candles of Scandinavia.
At the end of the day, tile decals empower you to take charge of your home's design story, one simple peel-and-stick square at a time.
Alright, this is where the fun really begins. Picking out the perfect decals for your tiles is hands-down the most exciting part of the project. But before you get carried away with gorgeous patterns, let's talk practicalities. The right decal isn't just about a pretty face; it's about finding the right material for the job.
Think about where it's going. A kitchen backsplash behind the hob needs to handle the heat. Decals for floor tiles? They’ve got to be tough enough to take a beating from daily foot traffic. I’ve found that high-quality vinyl is usually the best all-rounder, giving you both water resistance and resilience.
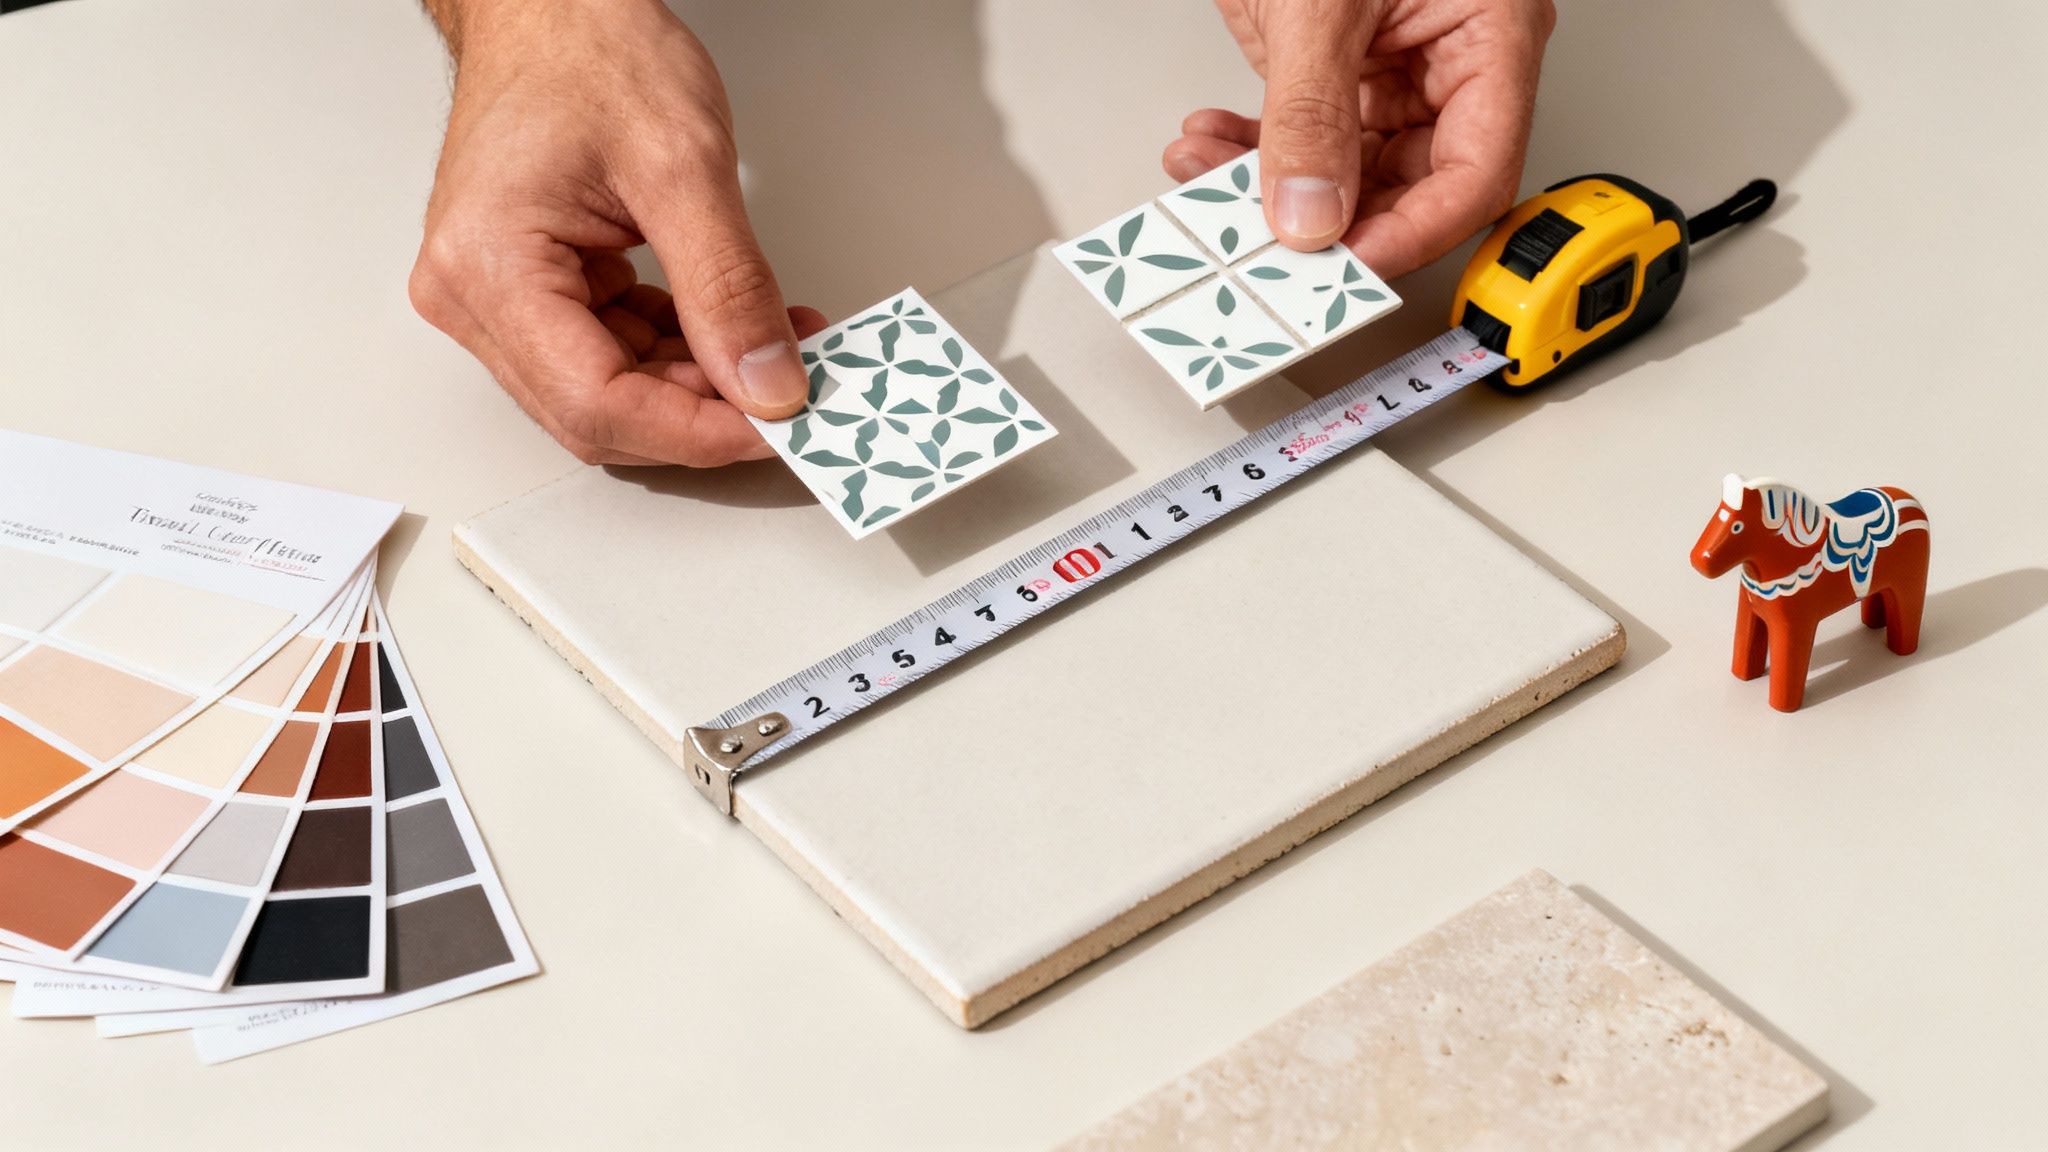
Now, before you fall head-over-heels for a design, grab your tape measure. It sounds simple, but it’s a crucial step people often rush. Make sure you measure a single tile from grout line to grout line, not just the visible tile face. Most good sellers offer custom sizing, which is a lifesaver for getting that perfect, professional-looking fit without any awkward gaps or overlaps.
Getting the technical bits sorted from the get-go will save you so much hassle later on. Your goal here is to find a decal that not only looks stunning but is also perfectly matched to its environment.
Here’s a piece of advice I give everyone: always order a sample first. Colours can be deceiving on a screen and look completely different under your home's unique lighting. A sample lets you feel the texture, test the stickiness, and see if that colour is truly the one you envisioned.
Remember, a sample isn't just a preview—it's a test run. Stick it on an inconspicuous tile for a few days. See how it holds up to a bit of steam in the bathroom or a quick wipe-down in the kitchen. This small step builds confidence in your final choice.
Once you’ve got your measurements locked in and you're happy with your sample, you can order with total peace of mind. Give your exact dimensions to the seller to get that custom fit. This is especially vital for intricate patterns that need to line up seamlessly from one tile to the next.
Now we're back to the fun part: choosing a look that screams you. The design possibilities are practically endless, from clean, minimalist geometric shapes to vibrant, intricate patterns that tell a story.
If you're aiming for that cosy, character-filled vibe, why not look at designs inspired by Scandinavian folk art? Motifs like the Dala horse or traditional folk-art florals can bring such a lovely touch of warmth and heritage into a room. They work beautifully as a statement backsplash or as charming accents scattered across a tiled floor.
A great way to create a cohesive look is to pull inspiration from other elements in your home. For instance, if you love the natural beauty of handcrafted items, you might find that the rustic appeal of wood wall art perfectly complements your new tile design. It’s these artistic touches, whether on your walls or your tiles, that help weave a consistent style through your space. The right decals don’t just cover a surface; they complete your home's story.
Let me share a secret from years of experience: the real magic of a professional, long-lasting tile decal finish isn't in the application itself—it's all in the prep work.
Think of your tiles as a canvas. You need a clean, smooth surface for the decal to adhere properly and look completely seamless. Rushing this stage is the number one mistake I see, and it almost always leads to peeling corners and trapped air bubbles down the line.
Excellent prep ensures your decals for tiles create a strong bond, giving you a result that truly lasts. The goal is to create an immaculate surface, free from any hint of grease, soap scum, or cleaning residues that could get in the way of the adhesive.
First things first, your tiles need a proper deep clean. Everyday grime, cooking oils in the kitchen, or that stubborn soap residue in the bathroom can form an invisible barrier between the tile and the decal. A quick wipe-down just won't cut it for this job.
I always recommend a good degreasing cleaner or even a simple solution of isopropyl alcohol and water. Steer clear of any oil-based cleaners or products that promise a "shine," as they often leave behind a slippery film that’s a nightmare for adhesion.
This kind of meticulous approach is becoming more popular as people embrace customising their homes. The Asia-Pacific tile market, valued at a massive USD 101 billion, shows a huge trend towards personalisation. In Vietnam, for example, 18% of tile exports are for the hospitality industry and feature decals, while e-commerce sales of DIY decal kits have jumped by 45%. Better yet, many modern decals are paired with eco-paints, cutting VOC emissions by 50%, making them a great sustainable choice. You can discover more insights about the tile market on kenresearch.com.
Of course, not all tile surfaces are perfectly smooth and even. But don't worry, a few common challenges can be easily managed with the right technique.
A little extra prep work on tricky surfaces makes all the difference. It’s what separates a project that looks 'good enough' from one that looks professionally installed. Taking the time to address grout and texture will pay off immensely.
If your tiles have a very light texture, you can still get a fantastic result. After applying the decal, just use a squeegee with firm, even pressure to push the vinyl into the subtle grooves of the tile surface. Working from the centre outwards really helps the decal conform to the texture.
Uneven or deep grout lines can also be tricky. If your grout lines sit much lower than the tile surface, the decal might have nothing to stick to in that gap. One really effective trick is to fill the grout lines with a sandable caulk or grout filler beforehand. This creates a flush, even surface before you even start cleaning, ensuring your decal lies perfectly flat and smooth across the entire area.
Right, with your tiles prepped and ready, it’s time for the fun part: bringing your design to life. Applying decals might seem simple, but a few little tricks of the trade can make the difference between a decent DIY job and a finish that looks absolutely seamless.
Let's get into how you can get that perfect result.
First things first, you need to decide whether you're going with a 'dry' or 'wet' application. The dry method is as straightforward as it gets – you just peel and stick. This works a treat for smaller decals or if you're feeling pretty confident about getting the placement right on the first try.
But if you're a beginner or you're working with a large, intricate pattern, I always recommend the wet method. It gives you so much more control. All you do is lightly spritz the tile and the sticky side of the decal with a mix of water and a tiny drop of washing-up liquid. This little bit of moisture lets you slide the decal around for a moment, so you can nudge it into the perfect position before it sticks for good.
This infographic breaks down the core prep work that makes any application a success.
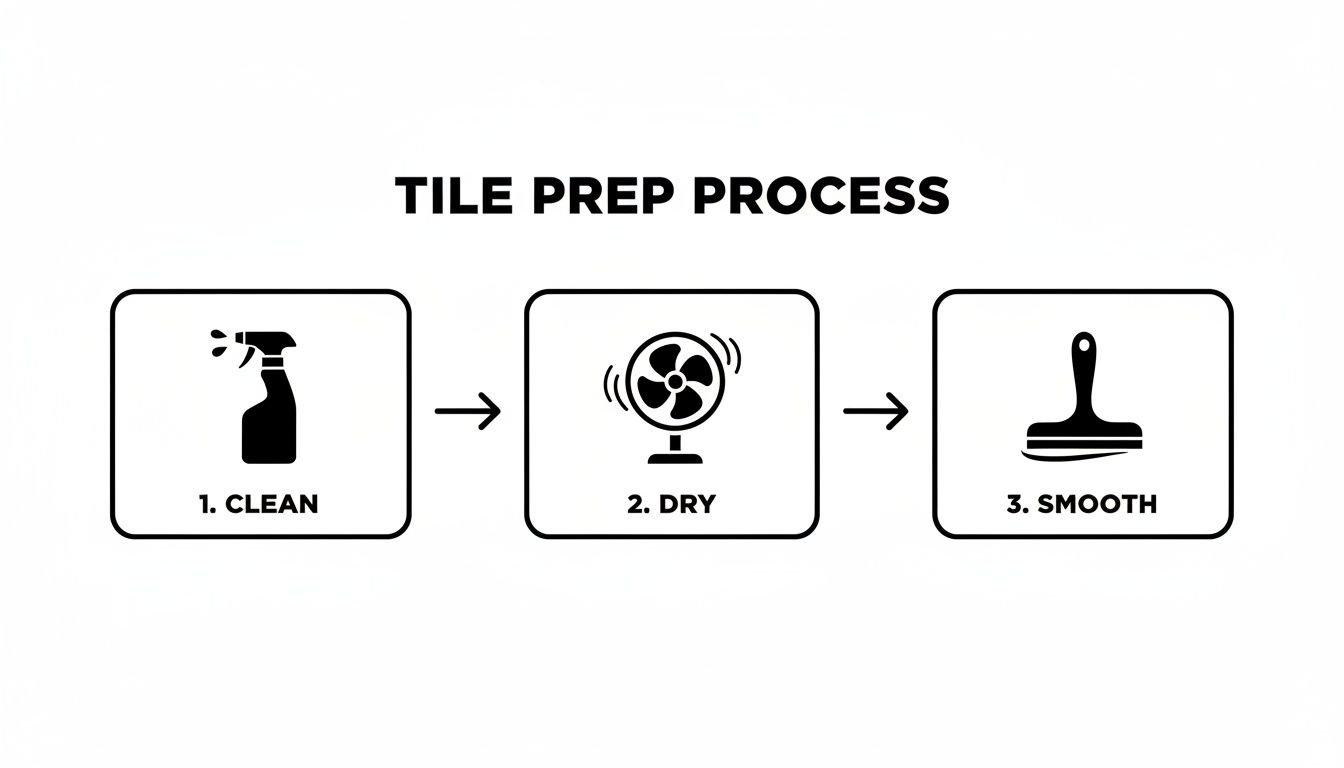
As you can see, getting the surface clean, dry, and smooth is the foundation for everything. It’s what stops annoying issues like peeling or bubbling down the line.
Getting the alignment spot-on is critical, especially if you're creating a pattern that needs to flow from one tile to the next. Even one slightly wonky decal can throw off the whole look.
My advice? Start by peeling back just the top inch or so of the backing paper. Line up this exposed sticky edge with the top of your tile, taking a moment to make sure it's dead straight.
Once you’re happy with the position, you can slowly peel away the rest of the backing paper, smoothing the decal down from the centre outwards as you go.
Pro Tip: A credit card or a little plastic squeegee is your best friend here. Use firm, overlapping strokes from the middle to the edges. This pushes out any trapped air and creates a strong, bubble-free bond with the tile.
This technique really minimises the risk of wrinkles from the get-go. Patience is truly your best tool at this stage.
Even with the most careful application, you might find a stray air bubble has snuck in. Don't panic! It’s an easy fix. A classic trick is to take a very fine pin or the sharp tip of a craft knife and prick a tiny hole right in the centre of the bubble.
This lets the trapped air escape. Simply press down on it gently, and the bubble will vanish without a trace.
For those tricky edges and corners, maybe around a sink or at the end of a wall, here’s how to get a clean finish:
So, you've perfectly applied your decals and your space looks incredible. The hard part is over! Now, let's talk about how to keep it looking that way for years to come. Proper care is what really locks in the value of your DIY project and ensures that beautiful new look lasts.
Most high-quality decals for tiles are surprisingly durable on their own, but in certain high-traffic or wet areas, an extra layer of protection is a very smart move. Think about places like shower walls that are constantly exposed to moisture, or even a busy hallway floor that sees a lot of foot traffic.
For these spots, applying a sealant can make all the difference. It creates a tough, invisible barrier that protects the decal edges from peeling and guards the design against general wear and tear.
Choosing the right sealant is key here. You don't want to accidentally ruin your beautiful work. Look for a clear, water-based polyurethane sealer specifically with a non-yellowing formula. These are low in odour and easy to work with, giving you a tough, protective finish without changing the decal’s colour one bit.
Before you even think about opening that can of sealant, make sure your decals have had at least 48-72 hours to fully bond with the tiles. This is crucial. Once you're ready, the process is straightforward:
This simple process really secures all your hard work, giving you peace of mind that your designs will stay vibrant and perfectly in place.
Good news: maintaining your decorated tiles is incredibly easy. The golden rule is simply to be gentle. Harsh chemical cleaners and abrasive scrubbers are the enemy of your decals. Over time, they can cause the design to fade or, worse, make the edges lift.
Instead, stick to mild, non-abrasive cleaners. A simple mixture of warm water and a few drops of gentle washing-up liquid is almost always all you need. Just use a soft cloth or a sponge to wipe the surface clean, and then rinse with plain water.
The goal of cleaning is preservation. By avoiding harsh chemicals and abrasive tools, you’re not just cleaning the surface; you’re actively extending the life and vibrancy of your tile decals.
This gentle approach is a small change in your cleaning routine that pays huge dividends in the long run. The growing trend towards customisation reflects this desire for lasting beauty. As the Southeast Asia ceramic tiles market expands, the use of decals has surged by 15-20%. This aligns with a greater focus on sustainability, where decals promote tile reusability—a practice that has increased by 25% in green-certified buildings. Read the full research about these market trends.
Diving into a new DIY project always brings up a few questions. When it comes to using decals for tiles, I’ve found that most people have similar concerns about durability, ease of use, and what happens when it's time for a change. Let's walk through some of the most common queries to get you started with confidence.
Absolutely, but it all comes down to a couple of key details. The success of decals in a wet environment like a shower really hinges on two things: the quality of the decal material itself and a truly flawless application.
High-quality vinyl decals are specifically made to be waterproof and handle high humidity. For any area that gets a direct soaking, though, meticulous surface preparation is non-negotiable.
Once you've applied the decal, you have to press down firmly on every single edge to create a perfect, watertight seal. This is the single most important step to prevent water from sneaking underneath. For extra peace of mind, you can even apply a clear, water-based polyurethane sealant over the top. This adds an impermeable barrier, protecting the edges from peeling and making sure your beautiful designs last for years.
Yes, and honestly, this is one of their biggest selling points, especially for renters. Good quality decals are designed to be completely removable without leaving a single trace on the original surface.
When you're ready to take them off, the process is simple and gentle.
If any sticky residue is left behind, a bit of rubbing alcohol or a citrus-based cleaner on a soft cloth will take it right off. The original tile underneath should look exactly as it did before.
This is a common one, and the answer really depends on how deep the texture is. Decals will always stick best to smooth, glossy, or satin-finished tiles. For tiles with a very light, subtle texture, a flexible, high-quality vinyl decal can still work beautifully.
The trick is to use firm, even pressure with a squeegee during application to really push the decal into those minor grooves. Using a 'wet application' method can also help achieve a much better bond in these cases.
However, for heavily textured, uneven, or porous tiles (like terracotta or natural stone), decals are unlikely to adhere properly and will probably peel or bubble. The best advice I can give is to always order a single sample decal to test on your specific tile before you commit to an entire set.
This small step can save you a whole lot of time and disappointment down the road. If you have more specific questions about materials or application, our FAQ page has more detailed guidance to help you make the right choice for your home.
The lifespan of your tile decals is shaped by a few key things: the quality of the decal, how well you prepared the surface, and where it’s located. In low-traffic, dry areas like a kitchen backsplash away from the sink, a premium decal can easily last for five years or even longer.
In high-traffic areas, like a floor, or in constantly wet environments like a shower, the lifespan might be closer to two or three years. Following proper maintenance—like avoiding harsh, abrasive cleaners—is absolutely crucial for getting the most out of them.
Ultimately, choosing decals made from premium, laminated vinyl will always give you the best performance and longevity. They are specifically engineered to withstand the rigours of daily life while keeping their colour and adhesion intact.
Ready to bring a touch of timeless Scandinavian charm to your home? Explore the authentic, handcrafted collections at Dalaart and find the perfect piece to begin your own story. Shop our exclusive Dala horses and folk-art treasures today!


.svg)


.png)


